
In previous article, we have setup kubernetes cluster by using minikube and applied some kubectl command to deploy sample Node.js application to kubernetes cluster. In this article, we will configure our application in a way that it will be auto-scaled according to cpu load. Fasten your belts !
Horizontal Pod Autoscaler
Kubernetes helps us to scale desired pod in a replication controller, deployment, or replica set according to observed CPU utilization.
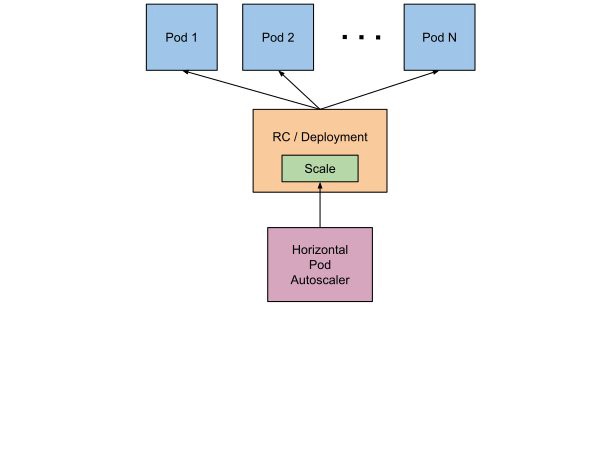
The logic behind above architecture is very simple. Controller manager queries the system resources within a specific period defined by option — horizontal-pod-autoscaler-sync-period (30 seconds by default), and if the resources are in an exceeding state than the threshold you provided, the pods will be auto-scaled up. Contrarily, if the resources got back to normal state, the pods will be auto-scaled down.
Configuration
There are several ways to configure application for auto-scaling, and we will defined this config inside our project I mean in k8s folder. I assume you have minikube started and already deployed Node.js application to kubernetes cluster. Go to project and add a file named hpa.yml to k8s folder, put following content to it
apiVersion: autoscaling/v1
kind: HorizontalPodAutoscaler
metadata:
 annotations:
 name: node-example
 namespace: default
spec:
 maxReplicas: 5
 minReplicas: 1
 scaleTargetRef:
  apiVersion: extensions/v1
  kind: Deployment
  name: node-example
 targetCPUUtilizationPercentage: 1
With targetCPUUtilizationPercentage option, we are saying that, Once the cpu load inside observed CPU more than 1%, scale this pod.
After this configuration, apply your changes with following
kubectl apply -f k8s/hpa.yml

You can be ensure about HPA configuration with following command;
kubectl get hpa

Metric Collection
As you can see, there is a strange thing above. Yeah, on TARGETS section, there is no current metric data. In order to fix that, you need to check addon list on minikube by;
minikube addons list
Here by default heapster addon is disabled. In order to let controller manager query your resources, you need to enable this addon. You can enable it via following;
minikube addons enable heapster
And now, we can see TARGETS value.

CPU usage is 0% and let’s make some loads to this application.
Hardening CPU
ab -c 5 -n 1000 -t 100000 http://192.168.99.100:30001/
I assumed you have already Apache Benchmark installed on your computer. With above command, in total 1000 request will be sent to our application within 100 seconds with a concurrency level 5. You can also see demo video below;
Conclusion
To sum up, we put a simple configuration to our project and applied to enable Horizontal Pod Autoscaler. By using Apache Benchmark tool, we sent some request to our application to hardening CPU. If you want to see HPA configs, you can access them here
